Meraki, Apple Classroom and ‘Not-shared’ shared iPads
Hi all, and welcome to yet-another, “I figured out something for a client and thought I should share” blog. In this post I’ll go over how I configured Apple Classroom on iPads that are shared, but aren’t ‘Shared-iPads’, using Meraki Systems Manager.
Setting the Scene
Right, before I get into the how, a bit more on the why, a bit more on the background on this specific setup:
- The customer was enrolled in Apple School Manager (ASM) and all 34 iPads were in the Device Enrolment Program (DEP)
- The customer’s School Information System (SIS) didn’t link with ASM
- The 34 iPads would be split into two groups (physically into two trollies in two different classrooms)
- Each group would be made up of 16 student iPads, and 1 teacher iPad
- The first group would be called “Group A” and would be made up of iPads numbered 001 to 017 (with 001 being the teacher iPad)
- The second group would be called “Group B” and would be made up of iPads numbered 002, then 018 to 034 (with 002 being the teacher iPad)
- The teacher iPad should be able to control all 16 student iPads in its group, but not the iPads in the other group
- The students might swap iPads around, but they didn’t want to configure and maintain Managed Apple IDs so Shared iPad was not used
- The Apple Classroom App has been ‘purchased’ via VPP and is ready for scoping in Meraki Systems Manager (‘Meraki’)
But why not use Shared iPad?
The reasons for not using Apple’s Shared iPad are mostly lead by the customer’s requirements, including:
- The customer’s SIS isn’t compatible with ASM
- They didn’t want to have to setup Apple IDs for their students, including the ongoing maintenance as students join and leave
- They didn’t want the pupils (all Primary School age) to have to log into the iPads
- They would typically give the same iPad to the same pupil if they are completing projects that spread over multiple lessons / days
- They generally wanted the solution to be as simple and low maintenance as possible
Doesn’t Meraki Already Cover a Similar Setup?
Kinda, in their KB Article “Configuring Apple School Manager for Shared iPad or 1-to-1 iPad” under the “Manual Configuration” heading. However, the video for this setup wasn’t clear on what was needed, and from where. To be honest, it also didn’t help with the ‘This is a fully configured profile, there you go’ method… ¯\_(ツ)_/¯
Apple Requirements or “Good to Know’s”
- All (student) devices need to be supervised. DEP is strongly recommended for this
- Allowing Classroom observation requires iOS 9.3+ (Configuration profile payload)
- Limiting of Bluetooth settings requires iOS 10.0+ (Configuration profile payload)
- Each device can only have one “Education” profile payload deployed
Step by Step
Right, so hopefully you have an idea of the setup. Lets go through the step by step on how I got things working within those constraints:
1) Firstly, ensure all iPads involved are enrolled in your Meraki instance. At least the student iPads (although ideally all) need to be supervised so I’d strongly suggest using DEP for this.
Tip: If you are using DEP, you configure almost all (maybe all?) of this whilst the devices are listed but not actually enrolled!
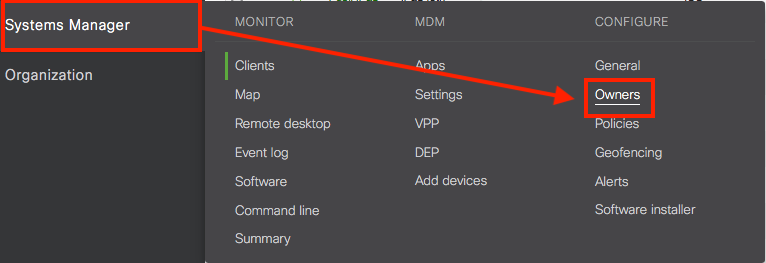
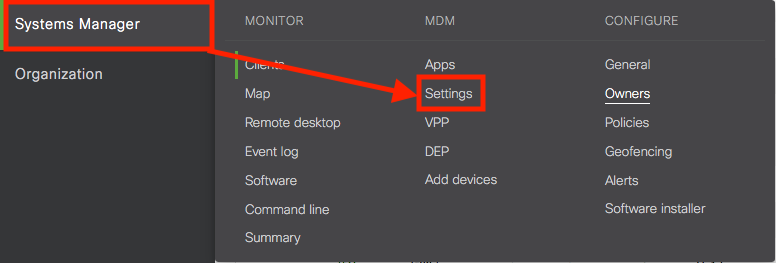
2) Navigate to the “Owners” section of your Meraki instance.
3) Now the boring bit, we need to create an “Owner” for each iPad. In the case of the above, that meant 34 ‘Owners’.
Click “Add new” and give each owner a “Full Name” and an “Email Address”
Tip: Be lazy efficient and use the email address as the full name here. This will allow you to copy and paste between the two, saving a little bit of time!

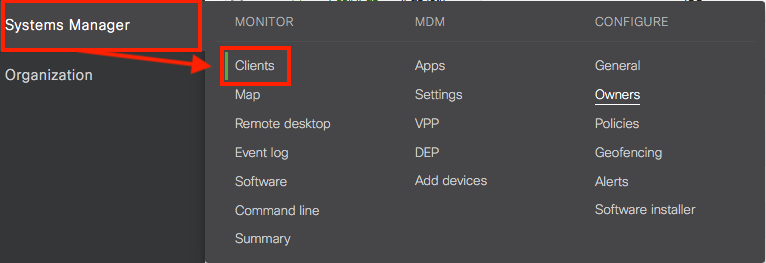
4) Next we need to assign each iPad one of our Owners. Navigate to the “Clients” section of your Meraki instance.
5) For each device record:
a) Navigate to the record and click “Edit details”
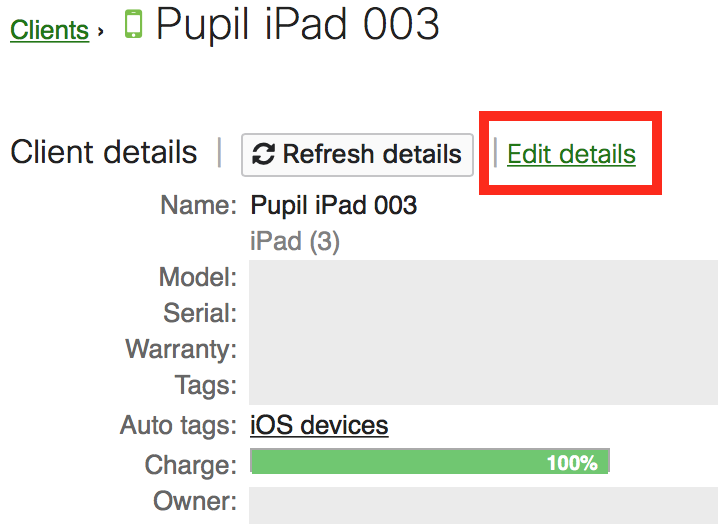
b) Use the “Owner” dropdown box to select the matching owner we created in step 3 (e.g. iPad 003 should be assigned to Owner 003) and click “Save”

c) Repeat this for every iPad
6) Next we need to create our “Education” profile. Navigate to the “Settings” section of your Meraki instance.
7) Click “+ Add profile”

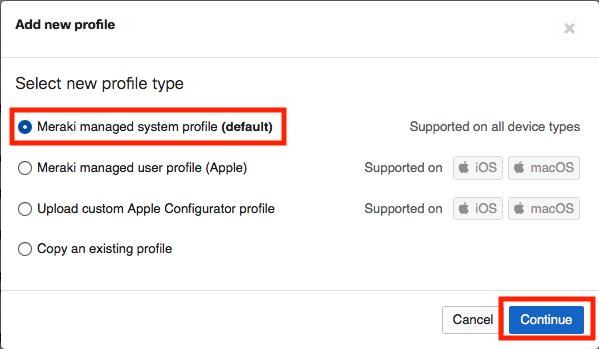
8) Select “Meraki managed system profile” (the default) and click “Continue”
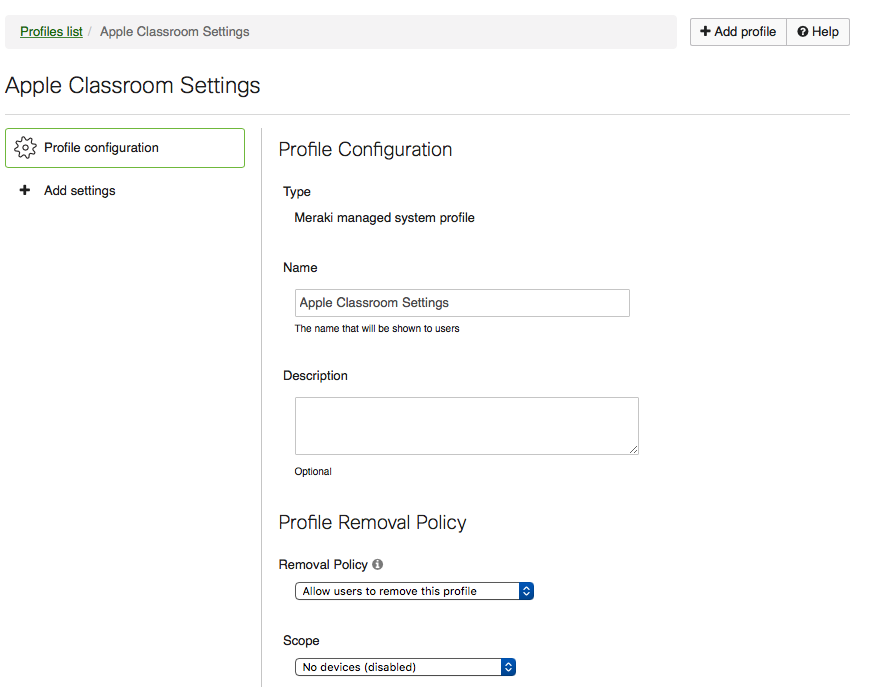
9) Give your profile an appropriate name, an optional description and an appropriate scope
Tip: I’d suggest setting the scope to “No devices (disabled)” whilst you set the profile up, then scope it out once complete.
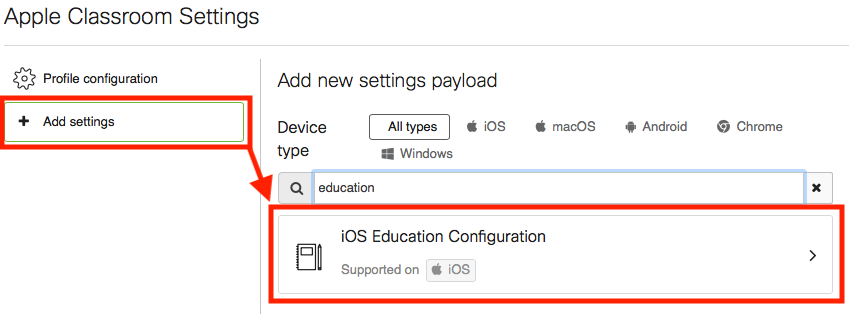
10) Click the “+ Add settings” option and add the “iOS Education Configuration” payload
Tip: Use the search box to make finding this payload a little easier
11) Right, time to fill in the profile! Under the “Name” box, enter the Organisation name (this will auto-populate from the instance but can be changed if desired).
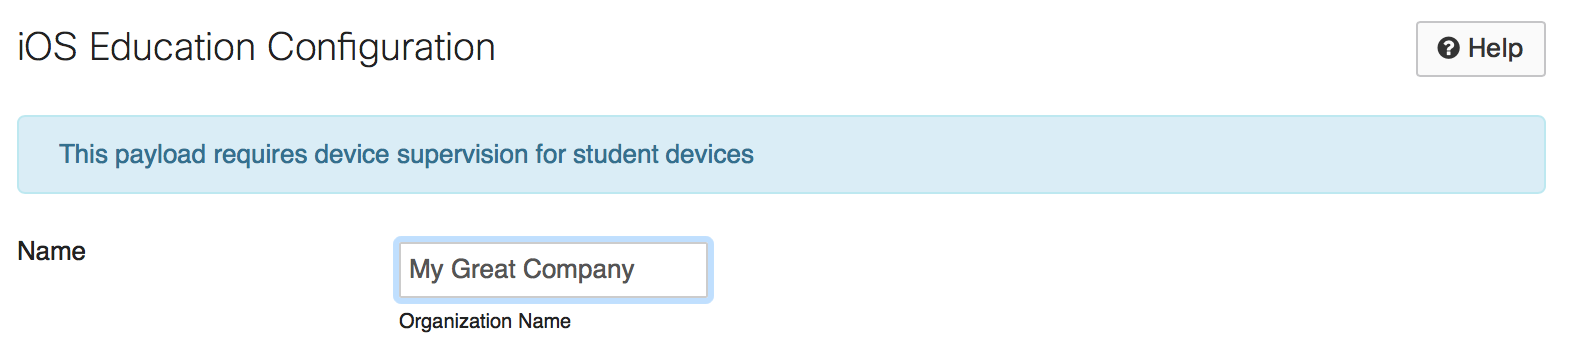
12) Under “Permissions”, tick the “Allow MDM to automatically approve screen observation” box

13) Under “ASM”, leave “Use ASM (Apple School Manager) for configuration” unticked (for this specific scenario)

14) Now we get to the longer areas of configuration. Repeat the below for each “Owner” we setup in step 3:
a) Under “Users”, click “Add user”

b) Enter the Name and Apple ID for each user and click “Save”
- “Name” should match the number of the iPad. This cannot be an email address
- “Apple ID” should match the email address of the user, as configured under the “Owners” section of Meraki.
- E.g.
- Name: 003
- Apple ID: 003@noreply.com
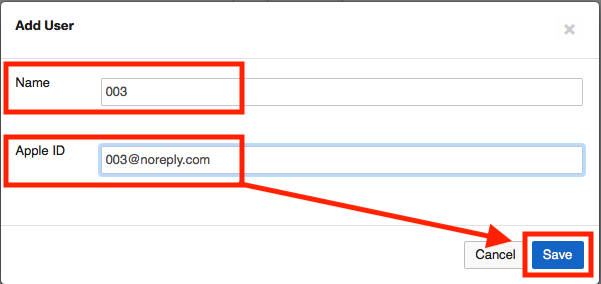
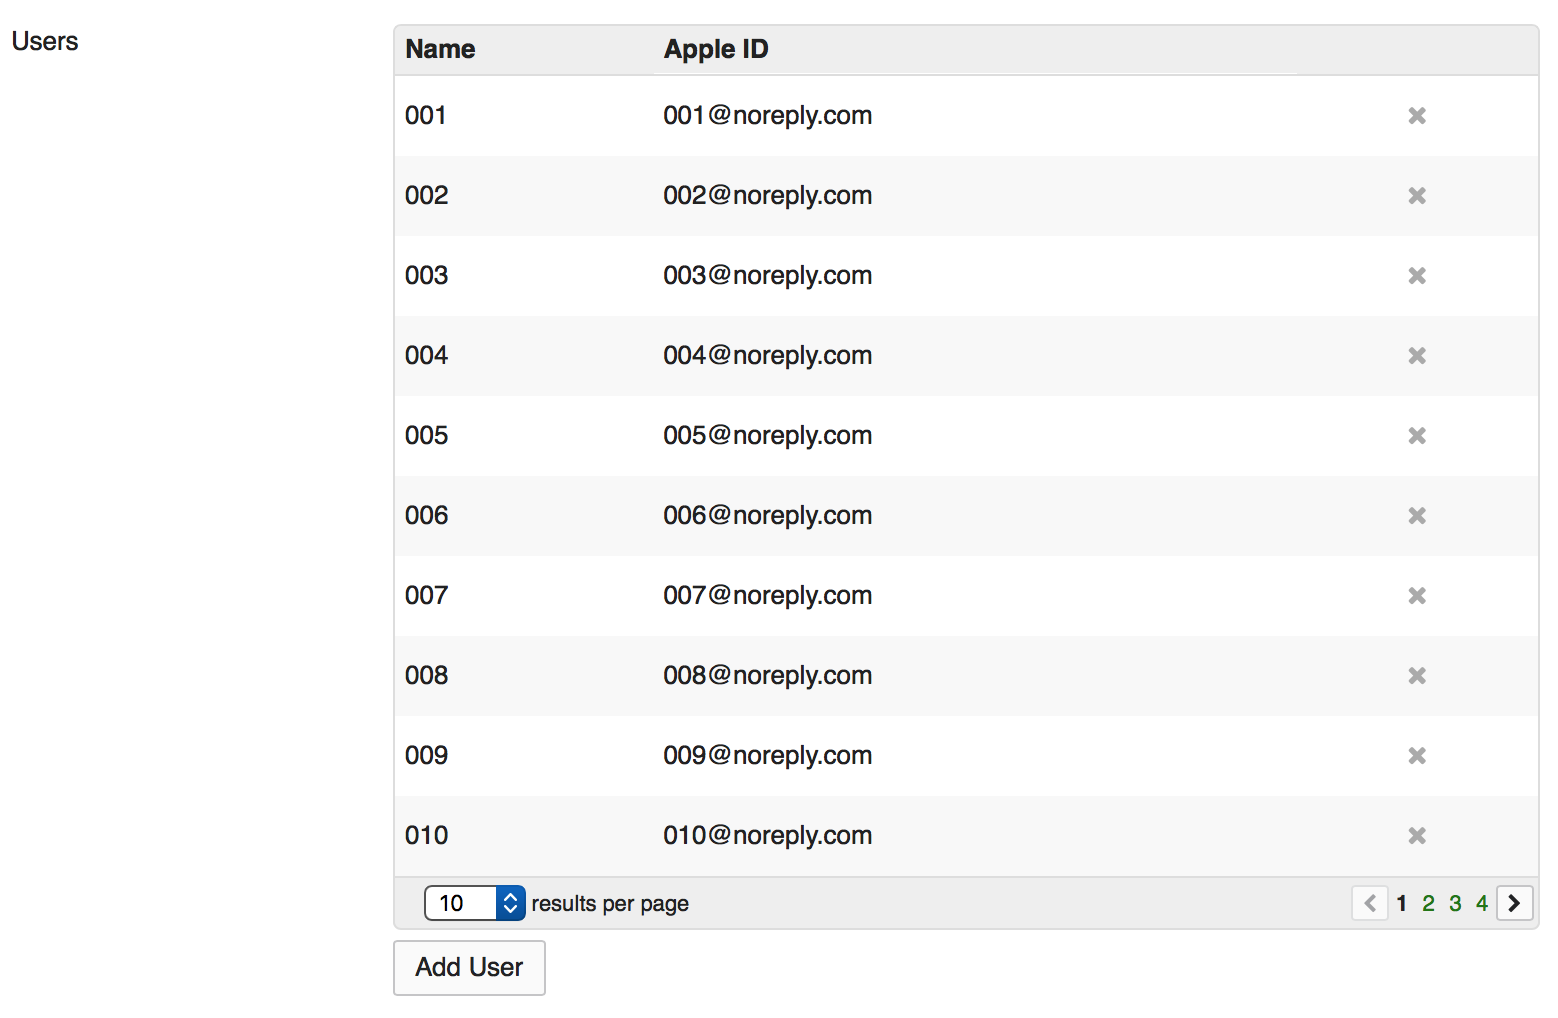
c) Repeat this for all users (001 to 034 for this specific scenario)
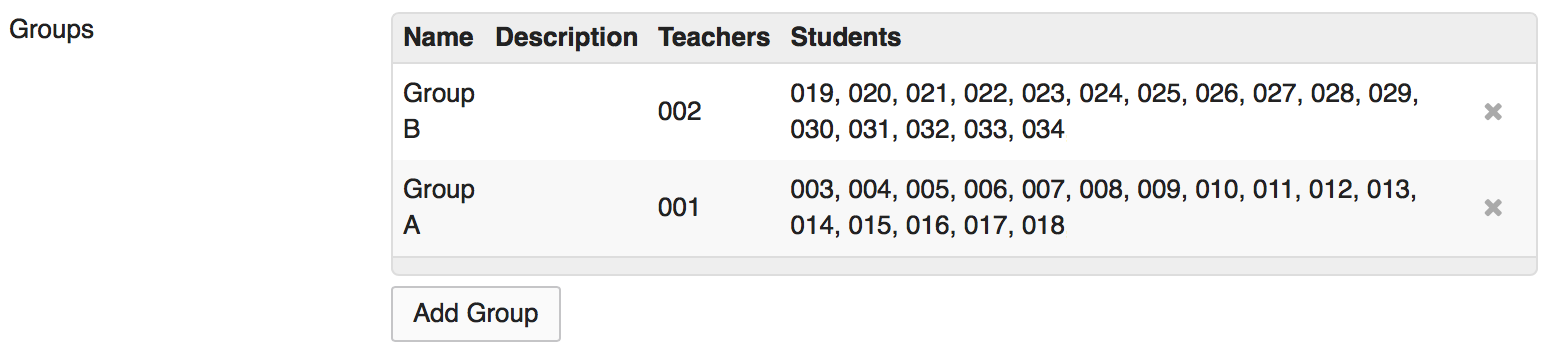
15) Next, onto the “Groups” section. For each group you require (in our case 2; “Group A” and “Group B”):
a) Click “Add Group”. Give the group a name in the “Name” box, e.g. “Group A”
b) Give the group a (optional) description in the “Description” box
c) Under the “Teachers” section, you should be able to select the Users from step 14 above. Add in only the teacher for this specific group of devices (e.g. Group A’s teacher is iPad 001, so we’ll add “001” to “Teachers” for “Group A”)
d) Under the “Students” section, you should be able to select the Users from step 14 above. Add in only the students for this specific group of devices (e.g. Group A’s students are iPads 003 to 018, so we’ll add iPads “003” to “018” to “Students” for “Group A”)
e) Click “Save”
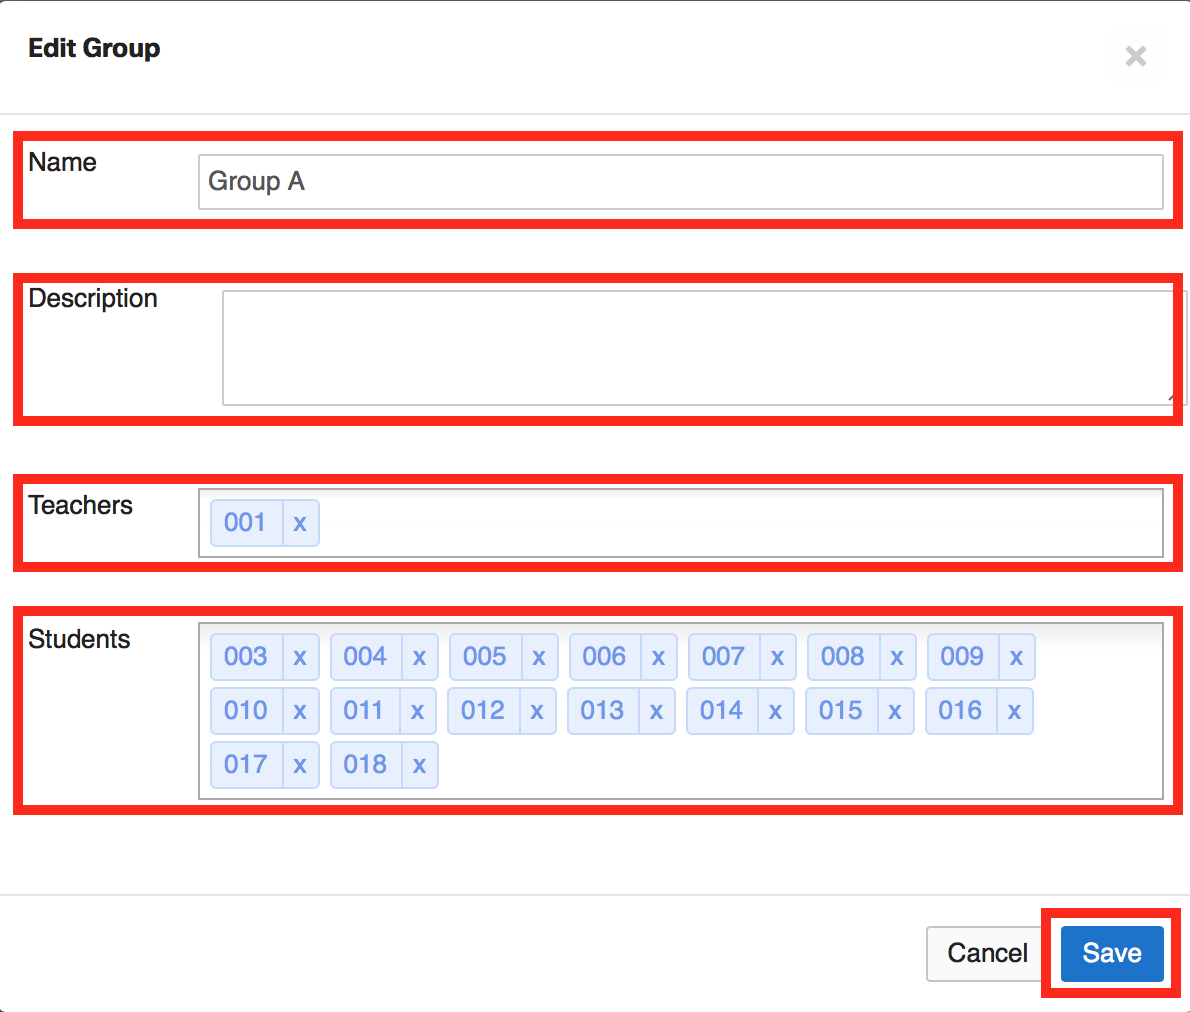
f) Repeat for as many groups as required. In this specific scenario, it was two groups, which resulted in this:
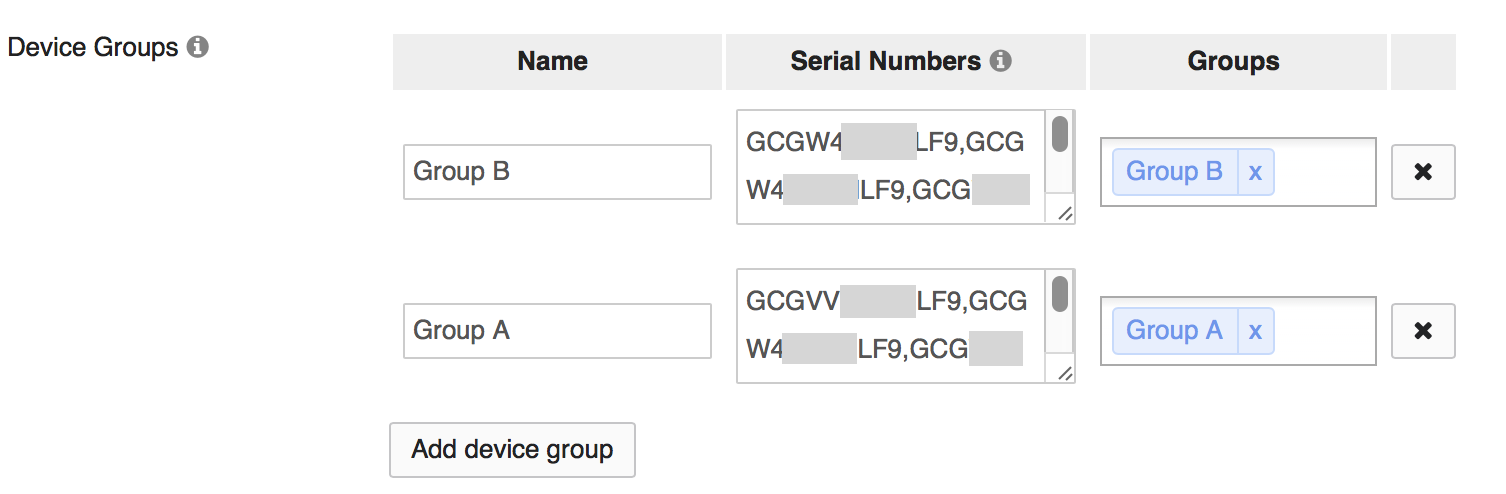
16) Next up, “Device Groups”. For each group you require (in our case 2; “Group A” and “Group B”):
a) Click “Add Device Group”. Give the group a name in the “Name” box, e.g. “Group A”
b) In the “Serial Numbers” box, paste in the serial numbers of each iPad in this group (including the teacher iPad), separated with a comma (“,”) and no spaces
c) In the “Groups” box, enter and select the matching group (e.g. “Device Group A” should select “Group A”).

d) Repeat for as many groups as required. In this specific scenario, it was two groups, which resulted in this:
17) Departments. I didn’t use Departments, but this is optional and another system to further categorise and organise the devices/users
18) Once you’re happy everything is configured correctly, click “Save” at the bottom
19) Use the “Scope” options, under the “Profile configuration” section to scope the profile out to the devices in question.
20) Use the VPP section to deploy the “Classroom” App to only the teacher devices.
21) Ensure that all pupil iPads have a configuration profile that contains a “Restrictions” Payload, and with the option “Allow remote screen observation by the Classroom app (iOS 9.3+)” enabled.
22) (Optional) Classroom discovery and linking between devices is done over Bluetooth. If students turn Bluetooth off, they can’t be managed. I’d recommend to also deploy a profile to all student devices with the “Restrictions” payload, and the option “Allow modification of Bluetooth settings (iOS 10.0+)” disabled.
23) Now test and enjoy!
Gotchas
During the setup, I came across two issues with various techniques to resolve:
1) When the Teacher iPad launches the Classroom app, an error message regarding an invalid configuration is displayed.
- For me, this was as the result of using email addresses as “Names” in the Education profile (see step 14 above), so don’t do that!
2) When the Teacher iPad launches the Classroom app, a number of Pupil iPads continue to show as offline
- This seemed to be an issue with the student iPads making themselves known to the teacher iPad. In order to force them to be picked up, I tried a mixture of resolutions including:
- Restart the pupil iPad
- Restart the teacher iPad
- Switch the bluetooth off and on on the teacher iPad
- Quit and relaunch the Classroom app on the teacher iPad
- A combination of 2, 3 and 4.
Summary
And there we go, I’ve detailed the steps I’ve used to configure Apple Classroom using Meraki, and iPads that would be shared, but aren’t “Shared iPads”. Am I doing this the long way? Is there better / faster methods to achieve the same goal? As always, if you have any questions, queries or comments, let us know below (or @daz_wallace on Mac Admins Slack) and I’ll try to respond to and delve into as many as I can.
The usual disclaimer:
While the author has taken care to provide our readers with accurate information, please use your discretion before acting upon information based on the blog post. I will not compensate you in any way whatsoever if you ever happen to suffer a loss/inconvenience/damage because of/while making use of information in this blog.